Smoke & Fire
How it works
The Smoke & Fire rule detects smoke and fire in a camera view and raises an event in Monitor.
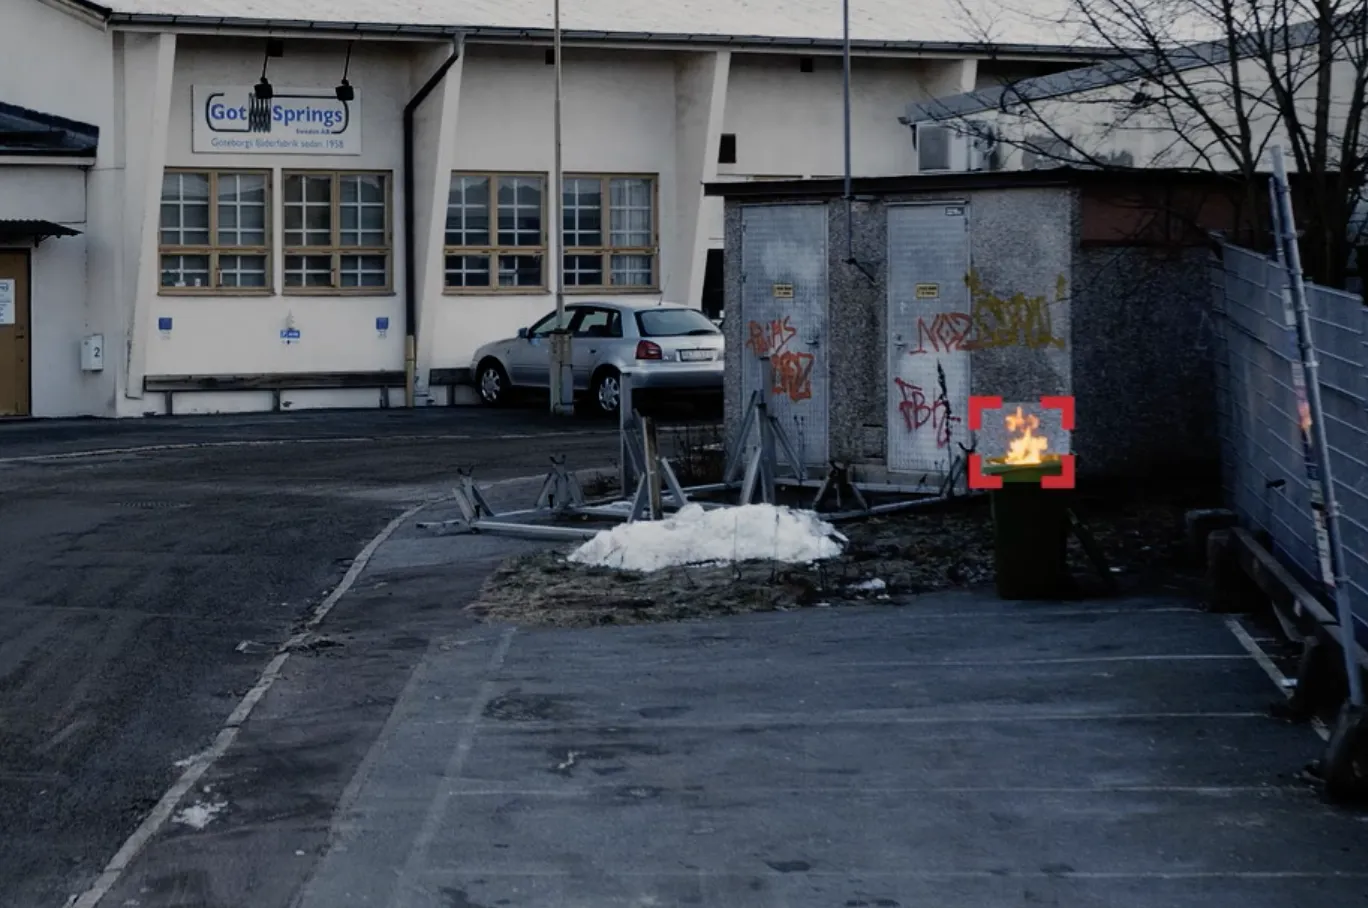
Good to know
- After an event, the rule waits 10 times the dwell time before it can raise another event for the same class. With the default dwell time, that is 5 minutes.
- Smoke and fire events show in Monitor. You cannot search for them in Investigate.
- Detection works on color images only. It stops when a camera switches to infrared at night.
- Fisheye views are not supported.
How it detects
The rule checks 1 frame every sampling time, 4 seconds by default. An event is raised when smoke or fire is found in the area in at least 80% of the checks over the dwell time, including the latest check.
flowchart LR
    A["Check 1 frame<br/>every sampling time"] --> B["80% of checks over<br/>the dwell time find<br/>smoke or fire"]
    B --> C["Event in Monitor"]
    C --> D["Same class pauses<br/>for 10 x dwell time"]
Detection works best with:
- Smoke or flame covering at least 10% of the image height
- White, gray or black smoke
- Smoke and fire that move upwards
- Flames in shades of orange, red, yellow or white
- Smoke or flame that stays in view for several seconds or longer
- Clearly visible haze filling a room, if diffuse smoke detection is turned on. See Technical deep dive
How to set up
Supported Objects and Cameras
Detected classes
Class | Supported |
|---|---|
Fire | ✓ |
Smoke | ✓ |
Diffuse smoke / Haze | Off by default |
Diffuse smoke detection is turned on with a device profile. See Technical deep dive.
Supported camera types
Camera type | Supported |
|---|---|
Color | ✓ |
IR | – |
Thermal | – |
A color camera that switches to infrared at night stops detecting until it returns to color.
Supported view types
Normal means a rectilinear view, as from a standard lens, where straight lines in the scene stay straight. Any view that is not fisheye counts as normal.
View type | Supported |
|---|---|
Normal | ✓ |
Fisheye, overhead | – |
Works with
Capability | Supported |
|---|---|
Monitor | ✓ |
Alarm Filtering | – |
Investigate search | – |
How the rule behaves
Result | What happens |
|---|---|
Smoke or fire in the area for the dwell time | The edge raises an event and sends it to the core. It shows in Monitor. |
Found in fewer than 80% of the checks over the dwell time | No event |
Detection looks like the calm scene | The check counts as found nothing, so usually no event |
Detector unavailable | No event |
After an event, the rule cannot raise another event for the same class until more than 10 times the dwell time has passed. With the default dwell time of 30 seconds, that is 5 minutes. If the smoke or fire is still there, the next event comes at the first check after that.
Use cases
The Smoke & Fire detector has primarily been optimized for:
- Outdoor smoke & fire, including industrial areas, gas stations, etc
- Indoor smoke & fire, warehouse fires, engine rooms, utility rooms
It has not been optimized for:
- Synthetic tests, such as smoke machines or cannons. Uniform test smoke scores lower than real smoke and fire, so it needs a higher sensitivity.
- Faint, gradually growing haze
Where to configure the rule
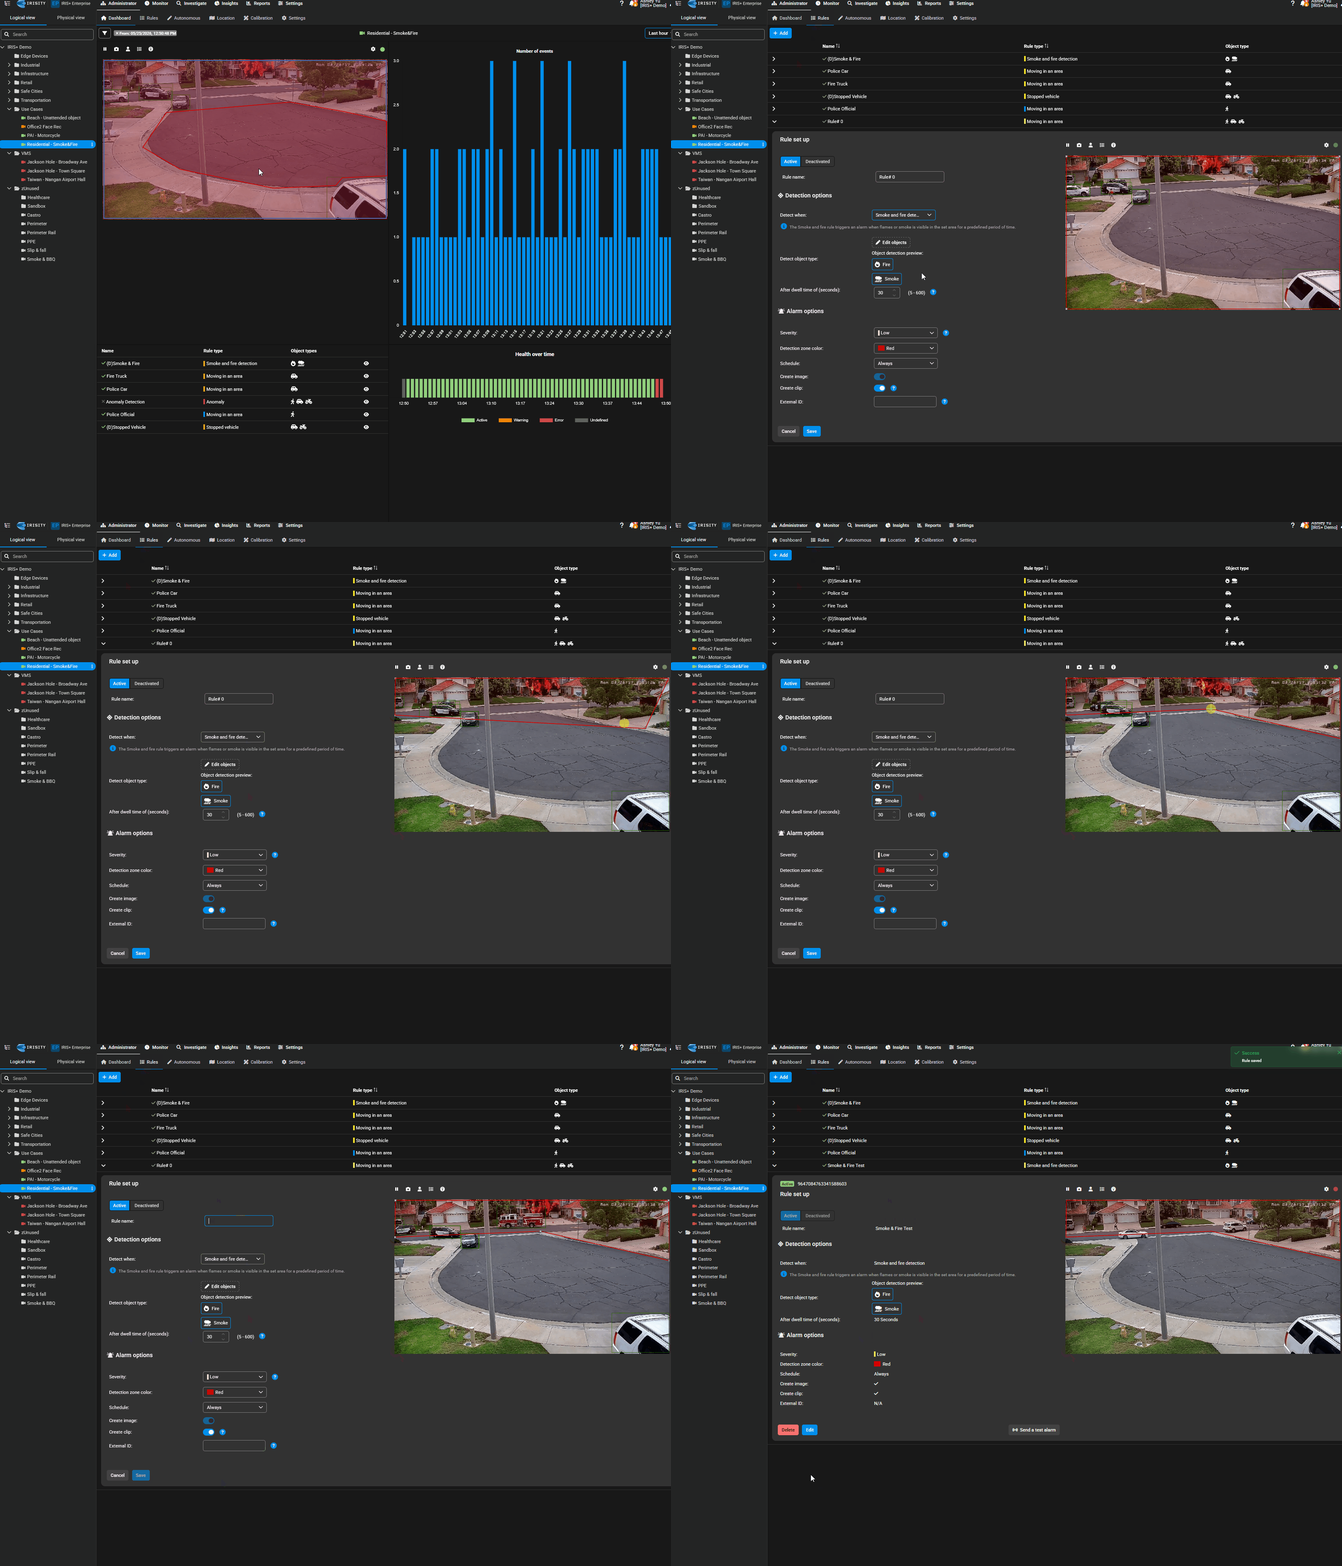
- Select a camera from the camera tree and create a new rule
- Select Smoke & Fire as the rule
Optimizing the detections
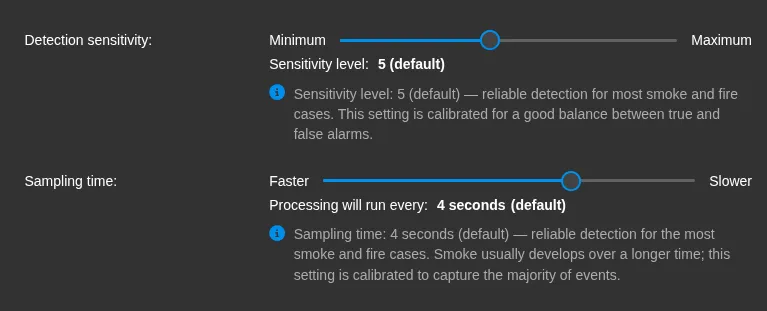
Dwell time
Dwell time sets how long smoke or fire must persist in the scene before an event is generated. It controls how many events you receive for a given incident.
- Range: 1–600 seconds. Default: 30 seconds. It cannot be shorter than the sampling time.
- A longer dwell time reduces false alarms and produces fewer, more confident events. A shorter dwell time makes detection more responsive but can generate more events.
- For most environments, 15 seconds is a good starting point. Lower it only if you need faster alerting and have confirmed the scene produces stable detection(s).
Detection sensitivity
Sets how confident the detector must be before it reports smoke or fire. There are 10 levels, and 5 is the default. A higher level gives more events.
- Note: This setting is available on-premise and will be made available in a late 2026 release of the cloud system.
Sampling time
Controls how often the detector samples frames of the stream.
- Note: Faster sampling will significantly increase the load on the GPU.
- Note: This setting is only available for on-premise systems.
What to expect
Smoke and fire tests
Synthetic smoke (from smoke machines or cannons) and controlled fire tests look different from real smoke and fire, so they can need a higher sensitivity than real incidents.
Typically, smoke machines and cannons have a controlled duration of smoke and fire generation, which doesn't reflect how smoke and fire work in nature.
If you are validating a setup with test smoke or test flames and detection(s) are not triggering, try raising the detection sensitivity.
Short events
For brief smoke or flame events, use a shorter dwell time so the incident persists long enough relative to the dwell window to raise an event. Make sure the smoke or flame still fills enough of the frame during the event.
Long-burning fires
A sustained fire will typically generate repeated events for the duration of the incident. Use a longer dwell time if you want fewer, consolidated alerts, or a shorter dwell time if you want more frequent updates while the fire is active.
Tuning and troubleshooting
We strongly recommend leaving detection sensitivity and cadence at their default values. They have been tuned across extensive real-world data to give the best balance of detection and false alarms for most environments. If you do need to adjust them:
False Alarms
Lower the detection sensitivity
This is the recommended first step. At a lower level, the detector must be more confident before it reports smoke or fire.
Lower the level 1 or 2 steps at a time.
Increase the dwell time
A longer dwell time means smoke or fire must stay longer before the rule raises an event. Short bursts of something that looks like smoke then stop raising events.
A longer dwell time does not help when part of the scene looks like smoke or fire all the time. Those detections pass every check, so the alarm only comes later.
A longer dwell time also has costs. Real events arrive later by the same amount. The wait before the rule can raise another event also grows, because it is 10 times the dwell time.
Redraw the area
Use this when false alarms come from 1 spot in the view, such as a chimney that gives off smoke during normal work.
- Redraw the area to leave out that spot. The rule then no longer detects real smoke or fire there.
- Do not cover the spot with a second Smoke and Fire rule at a lower sensitivity. Each rule filters detections by its own sensitivity.
Missed Detections
Use this table to find the likely cause. If none fits, collect evidence and escalate to support.
What you see | Likely cause | What to do |
|---|---|---|
Diffuse smoke raises no event, such as a room slowly filling with haze | By default, the edge discards smoke that looks like the calm scene. | Turn on diffuse smoke detection for the device. See Setting up diffuse smoke detection. It needs analytics service 2026.4.1 or later. |
No smoke or fire events from any camera for an on-premise system | The detector on the core is not available, or the core has no GPU. | Check that inference-service-2 and Triton are running, and that the smoke-and-fire model is loaded. |
No events at night | The camera switched to infrared. | This is expected. Detection works on color images only. |
Smoke or fire is detected now and then, but no event is raised | The detections come and go. Over the dwell time, at least 80% of the checks must find smoke or fire, and so must the latest check. | Use the shortest dwell time the customer accepts. At the shortest dwell time, 2 checks in a row are enough. A longer dwell time needs a longer run of checks. On-premise, raising the sensitivity also helps, but may add false alarms. |
Diffuse smoke is not detected with the setting on | The detector does not find the smoke with enough confidence. | Check the setup in Setting up diffuse smoke detection, including the log line. Check that the haze is clearly visible in the camera image. On-premise, raising the sensitivity can help. |
No events on a fisheye camera | Smoke and Fire does not run on fisheye views. | Remove the rule. Cover the area with a camera that has a normal view. |
A smoke or fire event is missing, and another rule on the camera raised an event just before | The camera's Minimum time between events dropped it. The rule then waited 10 times the dwell time before trying again. | If the customer needs both events, lower Minimum time between events in the camera settings. |
1 event, then nothing while smoke or fire is still there | The rule is waiting 10 times the dwell time, or the smoke or fire has become part of the calm scene. | This is expected. |
Small or distant smoke or fire is not found | It covers too little of the image for the detector. | A camera closer to the risk area gives better results. A higher sensitivity can also help. |
The rule type is not offered | The license does not include Smoke and Fire, the camera is not a color camera, or the device is an Axis appliance. | Check the account license and the camera type. |
Constraints and tradeoffs
- The rule needs a GPU in the core. Every camera with the rule sends a frame every sampling time, even when nothing happens. GPU load grows with the number of cameras and with faster sampling. Use the hardware calculator to size the GPU.
- Detection works on color images only. When a color camera switches to infrared at night, detection stops. It starts again when the camera returns to color.
- The edge does not detect diffuse smoke by default. See Setting up diffuse smoke detection.
- Smoke or fire that stays still for several minutes can become part of the calm scene. After that, it stops counting. A slow, smoldering fire may raise fewer events than expected.
- Smoke just outside the area can also raise an event. See Technical notes.
- The camera setting Minimum time between events applies to all rules on the camera, so another rule’s event can block a smoke or fire event. See Technical notes.
- We recommend applying one smoke & fire rule per camera if possible. If you need different settings for fire and smoke, we suggest setting up at most one smoke rule, and one fire rule per camera.
- Alarm Filtering does not apply to smoke and fire events. They go straight through to Monitor.
- If the detector on the core is down, the rule raises no events.
Technical deep dive
How a check works
When a Smoke and Fire rule is active on a camera:
- The edge sends the whole camera frame to the detector on the core, once every sampling time.
- The detector returns any smoke and fire it finds above the sensitivity threshold.
- The edge records 1 check for each class. A check either found smoke or fire, or found nothing.
- The edge keeps a slowly updated picture of the calm scene. If a detection looks like the calm scene, the check counts as found nothing. This is why diffuse smoke is not detected by default.
- The edge raises an event when at least 80% of the checks over the dwell time found smoke or fire in the area. The latest check must also find it in the area.
Setting up diffuse smoke detection
Diffuse smoke is thin, spread-out smoke with no clear edges. You can still see the scene through it, for example haze that slowly fills a room. To the edge, it looks like the calm scene, so the edge discards it.
By default, Smoke and Fire does not detect diffuse smoke, because it can add false alarms in some scenes.
The device must run analytics service 2026.4.1 or later, or 2026 R2.1 on-premise. The standard 2026.4 cloud setup runs an older analytics build that does not have the setting. Setting it there does nothing.
To detect diffuse smoke on a device, set an environment variable in a device profile:
- Go to Settings → Device profiles.
- Add a profile, or open an existing one.
- Add the component innovi-analytics-service.
- Add the variable OVERRIDE_SMOKE_REF_SAMEDIFF_THRESHOLD with the value 0.
- Choose the profile in the device's Custom profile setting.
Good to know about this setting:
- It applies to all cameras on the device.
- It affects smoke only. Fire detection is unchanged.
- 0 turns the calm scene check off for smoke. A value between 0 and 1.2 makes it less strict. Without the variable, 1.2 applies.
- The analytics service reads the value when it starts.
- Only users with the Admin role can manage device profiles.
To check that the setting took effect, look for this line in the analytics service log on the device:
Overriding smoke reference same/diff threshold with env var 1.200000 -> 0.000000
If the line is missing, restart the analytics service. To turn the setting off again, remove the variable from the profile, or remove the profile from the device.
Technical notes
- The flow is periodic, not driven by events. Alarm Filtering sends 1 crop for each event to verify it.
- If a camera has alarm filtering on, smoke and fire events enter the alarm filter queue, but no verification request is made, because the alarm filter confirms people, vehicles and two-wheeled vehicles. The events go straight through to Monitor.
- Rules created through the API without a sensitivity use the model defaults, which equal level 5.
- To detect a camera switching mode from color to IR, the system checks frames about once a second. After 2 grayscale frames in a row, it treats the camera as IR. It resets its external models and the calm scene. The smoke and fire model supports color cameras only, so it is dropped until the camera returns to color.
- The rule editor saves 1 area per rule. The API accepts a rule with several areas, and the edge then counts overlap with any of them. If you open such a rule in the rule editor and change its drawing, the editor saves only the shape you changed.
- When anonymization is on, the detector receives the anonymized frame.
- Integrations receive smoke and fire events as FireAlarm, and Patriot receives code 215. External API v2 reports the object type of smoke and fire events as PERSON.
- OVERRIDE_SMOKE_REF_SAMEDIFF_THRESHOLD must be a number of 0 or more. The edge logs and ignores any other value.
- Frames are taken at a fixed interval, regardless of what happens in the scene. The edge does not analyze every frame of the video. An event always needs at least 2 checks in a row.
- The 10% of image height is a recommendation for good results, not a technical cutoff. Smaller smoke or flame can still be detected, especially at higher sensitivity.
- Detection sensitivity adjusts per-class detection-confidence thresholds. The detector is a trained model that recognizes smoke and fire by their overall appearance. There is no separate setting for shape, color or brightness.
- The area check is loose. The edge combines all smoke boxes in a frame into 1 box, and any overlap with the area counts. Smoke on both sides of an area can raise an event even if none of it is inside.
- The camera setting Minimum time between events, 30 seconds on new cameras, applies to all rules on the camera together. If the smoke or fire rule triggers within that time after another rule's event, such as Moving in an Area, its event is dropped. The rule still counts it, so it waits 10 times the dwell time before trying again. With the default settings, that is 5 minutes. Busy scenes make this more likely.
Definitions
- Edge: the device that runs analytics on site and decides whether to raise an event.
- Core: the server that runs the smoke and fire detector on its GPU.
- Check: one frame sent to the detector. A check either finds smoke or fire, or finds nothing.
- Sampling time: how often the edge sends a frame to the detector. Default: 4 seconds.
- Dwell time: how long smoke or fire must be present before the rule raises an event. Default: 30 seconds.
- Detection sensitivity: how confident the detector must be before it reports smoke or fire. 10 levels, default 5.
- Diffuse smoke: thin, spread-out smoke with no clear edges, such as haze slowly filling a room.
On-premise and cloud
Setting | On-premise | Cloud |
|---|---|---|
Detection sensitivity | Available in the rule editor | Coming in a late 2026 release |
Sampling time | Available in the rule editor | Not available |
Default values | Level 5, every 4 seconds | Level 5, every 4 seconds |
Diffuse smoke detection | 2026 R2.1 or later | Analytics service 2026.4.1 or later. |