HTTP/HTTPS/WebHook
Overview
A WebHook (a web callback or HTTP push API) is a way for an application to provide 3rd party applications with real-time information. It is unlike typical APIs whereby the 3rd party application needs to poll for data very frequently to receive information in real time. This makes WebHooks much more efficient for both the originating application and the receiving 3rd party application.
IRIS+™ WebHook
IRIS+™ WebHook API is designed to push events detected in real-time to 3rd party applications by invoking HTTP/S POST requests to the endpoint provided by the 3rd party application. The IRIS+™ WebHook API is designed to support many 3rd party applications by providing a highly customized data transformation mechanism (using a template engine) to enable the user to design the data structure in line with their needs, rather than re-writing their existing HTTP/S endpoint (which is not possible in cases where the user employs a closed commercial package without the ability to modify the API).
Using the IRIS+™ WebHook API
The user can use IRIS+™ default WebHook definitions or customize the data according to their needs
Step 1: Define the integration target
- Login into your IRIS+™ account and open the Integration Targets tab under the Settings module.
- Add integration target of type HTTP, and configure the following settings

- Method: Provide the HTTP method (the most common use case is POST but we support PUT and GET as well)
- URL: Provide the HTTP URL endpoint to which IRIS+™ will submit the requests Note: Both HTTP and HTTPS URLs are supported. HTTPS is recommended for security reasons
- Headers: You may provide a list of HTTP headers that will be added to the request By default, the following header is added: Content-Type: application/json
3. Provide the HTTP method (usually POST), URL, and HTTP headers. The URL should use the schema http:// or https:// as required by the integrated system The HTTP headers are required by the integrated system (e.g. for security tokens)
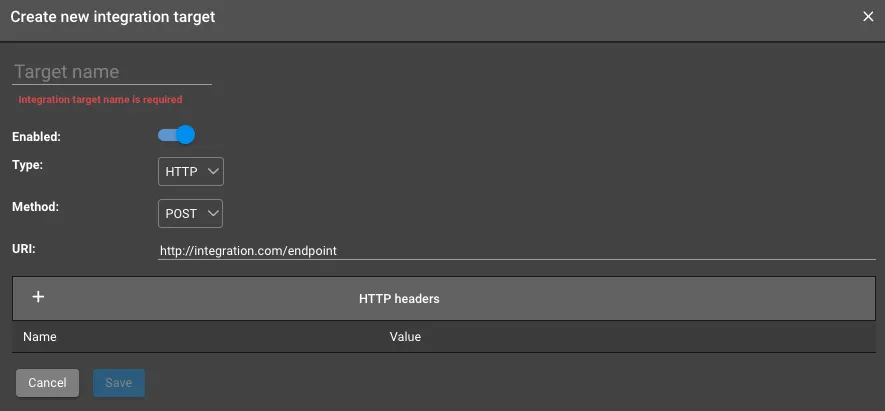
4. Name the integration target and save it.
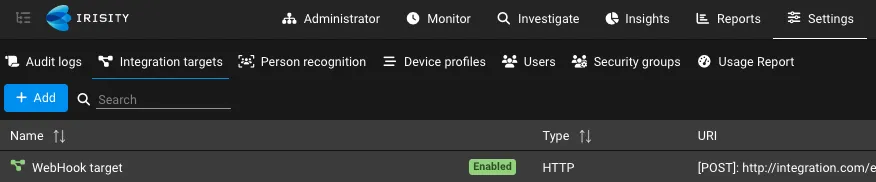
Step 2: Define integration action
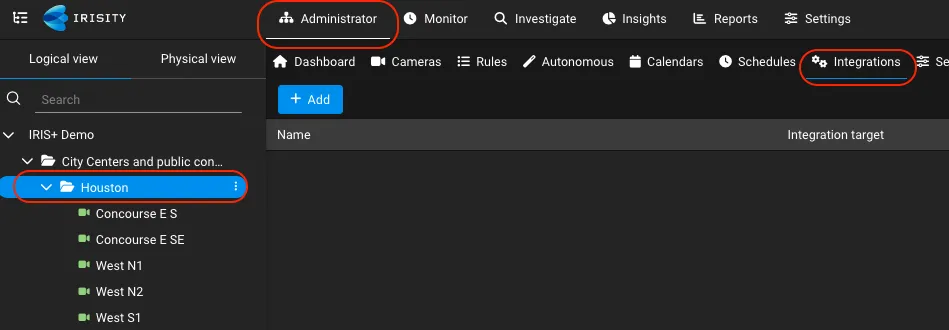
- Integration actions can be specified in the root (account) level or any folder in the account hierarchy When an event is generated for the sensor, any integration action specified in the sensor's folder or any parent folder (up to the account level) will be invoked, there is no limit on the number of integrations so a single event may invoke several integration actions.
- In the Administrator tab, select the folder in the account hierarchy where you want to invoke the integration action, select the Integrations tab, add a new integration action, and configure the following settings:
- Action Name: Enter a meaningful name such as the type of events being monitored
- Mode: select between Automatic Manual or Off
- Type: Select whether to integrate a Detection event or a Health event
- Target: Select the integration target from the list (only targets of type HTTP/S are listed)
- MIME Type: Provide the MIME type. The default is application/json for the body that includes JSON format but you may change it (e.g. if you want the body to include XML, you should provide MIME Type application/xml)
- Body Template: You may provide a template to customize the body content. You can specify any text you want and use system-defined template variables to be replaced by the event attributes at run time when the system shall invoke the integration action
Click the "?" to see a list of system-defined variables
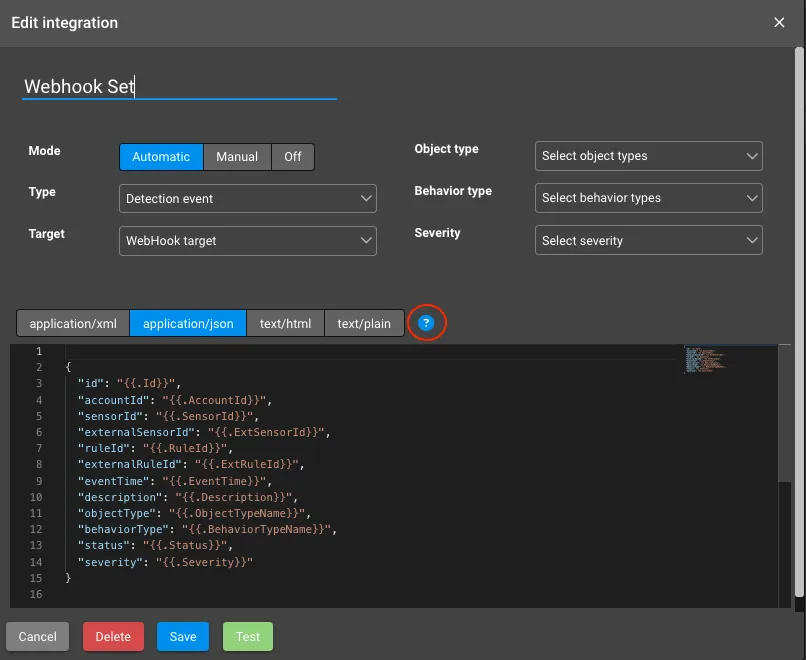
- Click Save
Click the Test to verify the integration is working properly.
You can use this website to test the integration:
Note: The IRIS+ outbound traffic is sent over NAT with public IP 34.90.111.200. Ensure your firewall settings allow incoming traffic from this IP address
Template Variables for Health Alerts
Body templates can contain any text in any format, and you can include template variables inside them. When the integration action is triggered, these variables will automatically be replaced with real event values.
To include a variable in your text, use the following pattern: {{.variable_name}} Be sure to include the period in the beginning of the variable name.
Variable | Type | Description | |
|---|---|---|---|
{{.AccountId}} | String | Unique Identifier of the account that owns this health alert | |
{{.AccountName}} | String | Name of the account that owns this health alert | |
{{.Description}} | String | Only used for system health events | |
{{.EntityExternalId}} | String | External Camera Identifier for your integration | |
{{.EntityId}} | String | Identifier of the affected entity | |
{{.EntityName}} | String | Name of the affected entity | |
{{.EntityPath}} | String | Entity path in the hierarchy tree | |
{{.EntityType}} | Number | Numeric value for the entity type; pair with EntityTypeName for readability | |
{{.EntityTypeName}} | String | Readable entity type such as "Camera" or "Device" | |
{{.FolderExternalId}} | String | External folder Identifier (for integrations) | |
{{.FolderId}} | String | Folder Identifier that contains the entity | |
{{.FolderName}} | String | Folder name that contains the entity | |
{{.HealthEventId}} | String | Unique health alert Identifier (GUID with dashes format) | |
{{.ProblemStartedOn}} | Number | When the health issue was first detected (epoch milliseconds - for more info visit this link) | |
{{.State}} | Number | Health alert condition code; pair with StateName for readability | |
{{.StateName}} | String | Health alert condition name | |
{{.Status}} | Number | Open/closed status code for the alert; pair with StatusName for readability | |
{{.StatusName}} | String | Open/closed status name for the alert | |
{{.TestEvent}} | Boolean | True when the alert was triggered via “Send Test Alarm” | |
{{FormattedEventTime "MM/DD/YYYY HH:mm:ss:Z"}} | String | Health alert time formatted with the provided pattern; Z = UTC offset, z = timezone name | |
Contact Irisity Support
Customer Support: [email protected]