Immix
This guide will help you set up the integration between Irisity IRIS+™ CM and IMMIX to enable sending alarms generated in the Irisity system to IMMIX. Once completed you should be able to correlate alarms in the Irisity system with the right device in IMMIX.
As a prerequisite, you should have installed at least one camera and set it up in both systems.
Integration workflow overview
To set up the integration, follow the below steps. Each step is detailed in its own section further down in this document.
- Prepare your Immix environment
- Define an integration target in IRIS+
- Define integration actions in IRIS+
- Set the Immix external ID for IRIS+ folders
- Set the Immix external ID for IRIS+ cameras
- Test the Integration
Prepare Your Immix Environment for Integration
To monitor IRIS+ folders and the detected events or health events created by these folders, you will need to create a corresponding site in Immix. Additionally, an IRIS+ device must specify the origin point of IRIS+ events.
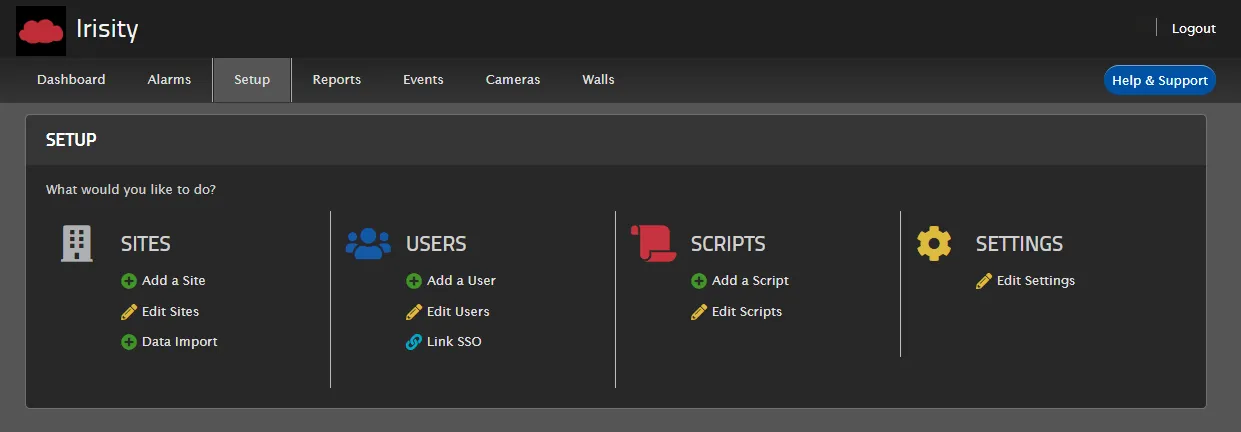
Prepare your Immix environment
- Port setup: port 465 or 587 should be open in the Immix firewall. The Irisity-hosted solution is run in the Google Cloud Platform, these are the only ports supported by Google. Keep these ports open for IRIS+ incoming events.
- In Immix Setup, select Add a Site and fill in the relevant details. Perform this step for each of the Irisity sites you would like to monitor. You can also edit an already existing site.
3. Select the site and click Manage Devices and Alarms in the right column.
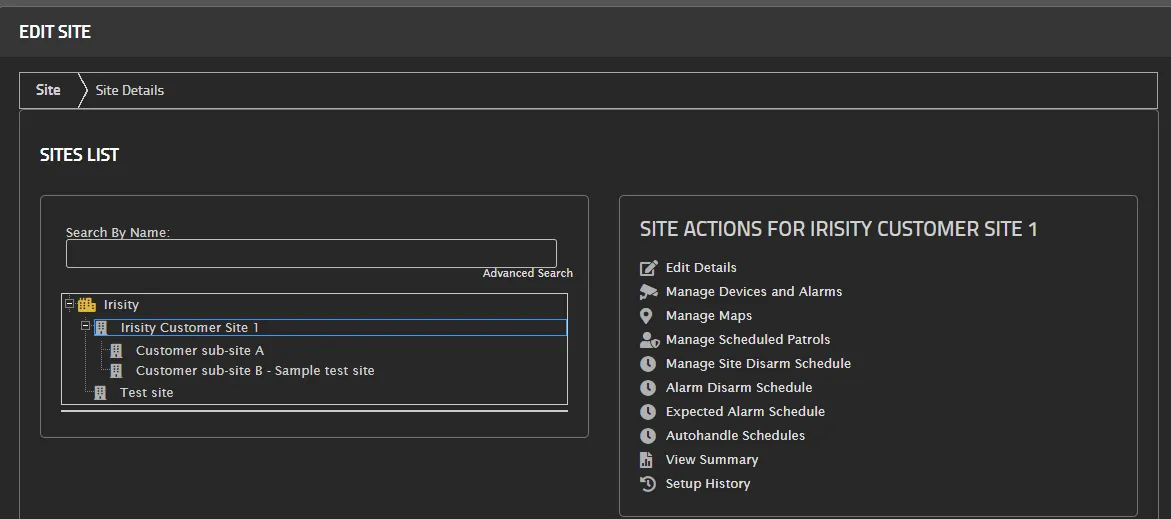
4. Click Add Device in the bottom right corner of the list
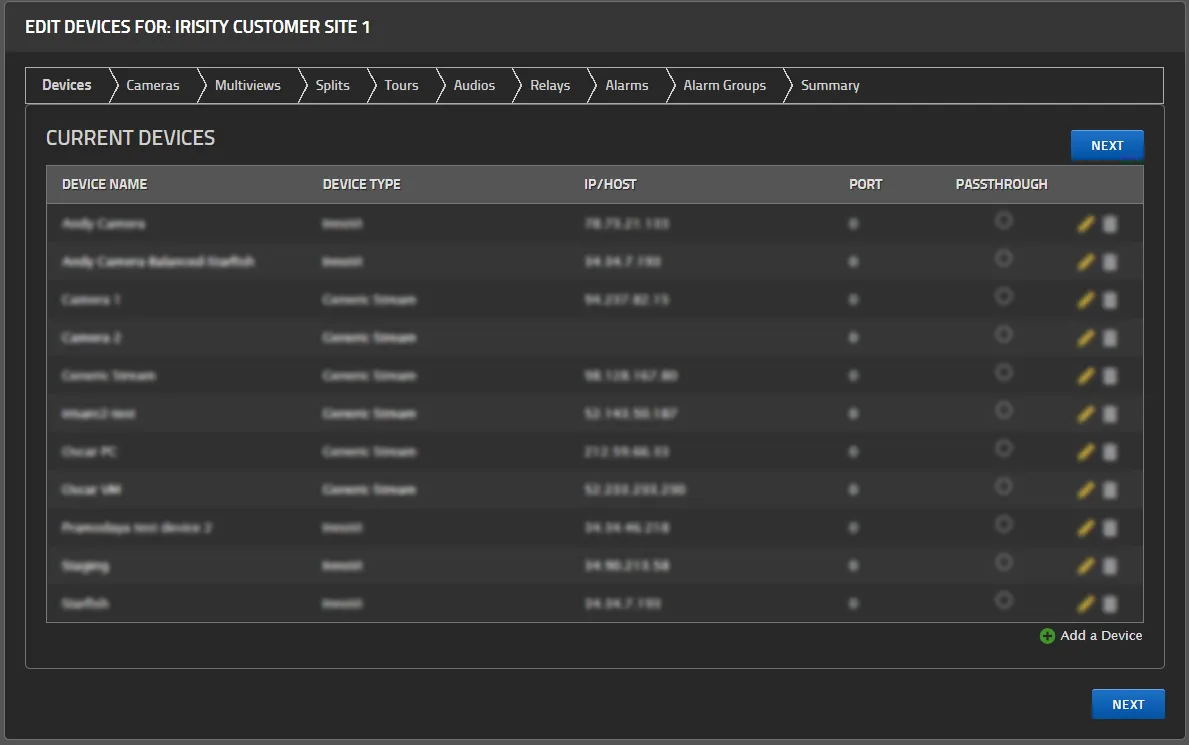
5. Add a device for IRIS+
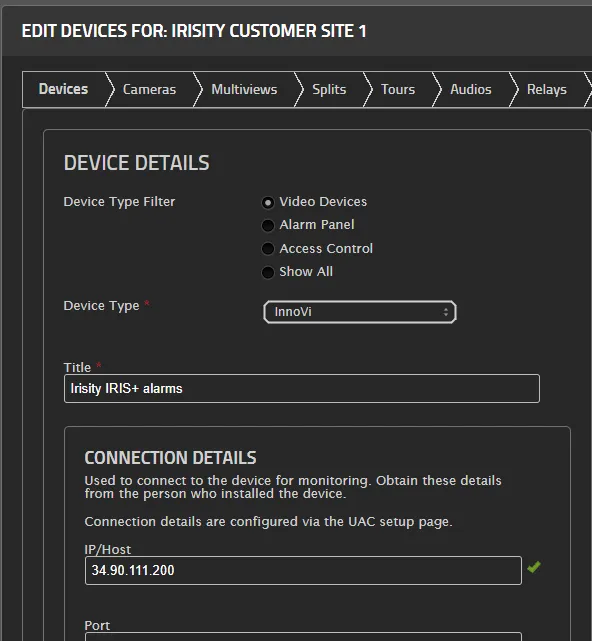
- Device Type: Video Devices => InnoVi
- IP/Host: 34.90.111.200 (this is the IP address of the IRIS+™ hosted service)
- Leave the rest of the fields empty
6. For each of the sites you have created, locate and document the relevant unique system number (S-number):
At the end of the site setup process, select View Summary. The Setup Report appears
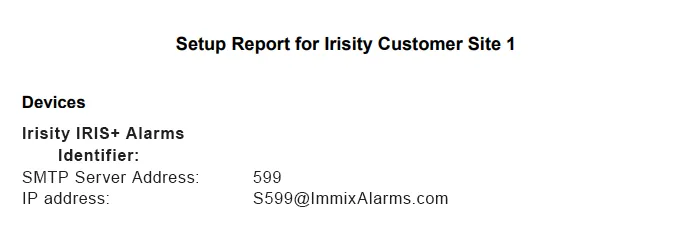
Write down and keep the Identifier (S-number). In this example, the identifier to keep is 599
Define Integration Target in IRIS+
Integration Targets in IRIS+ are used to define outgoing endpoints, where to send alarms and health alerts to.
Immix exists as a custom-build and supported integration, making setup very easy.
Define the Immix integration target in IRIS+
- Log in to IRIS+
- From the top menu bar, select Settings
- Select Integration Targets
- Click the Add button. The Integration Target screen appears

5. Name the integration and enter the details relevant for your Immix installation. Typically, user name and password are not required since Immix accepts alarms without authentication based on IP whitelisting.
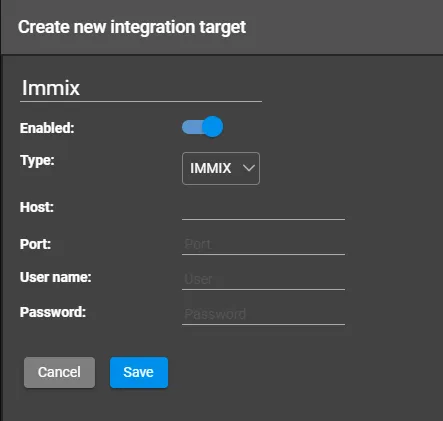
6. Click Save. The integration Target is defined and is listed in the Integration targets list
Define Integration Actions in IRIS+
Integration actions are account-level or folder-specific actions in IRIS+. These actions define what type of events are sent to the integrated system - whether it is detected events showing the video clip of a breached rule or health events alerting to health issues for camera or edge devices.
Define an integration action
Please note that it is possible to set up multiple integration actions with different configurations. This means that you can choose to send some alarm types from some folders and other alarm types from others.

- Select the Administrator tab
- In the tree in the left sidebar, either
- Select the top node (the Account) to send everything from the system to Immix.
- Select a Folder or Subfolder. Only alarms from cameras and devices in this folder will be sent to Immix.
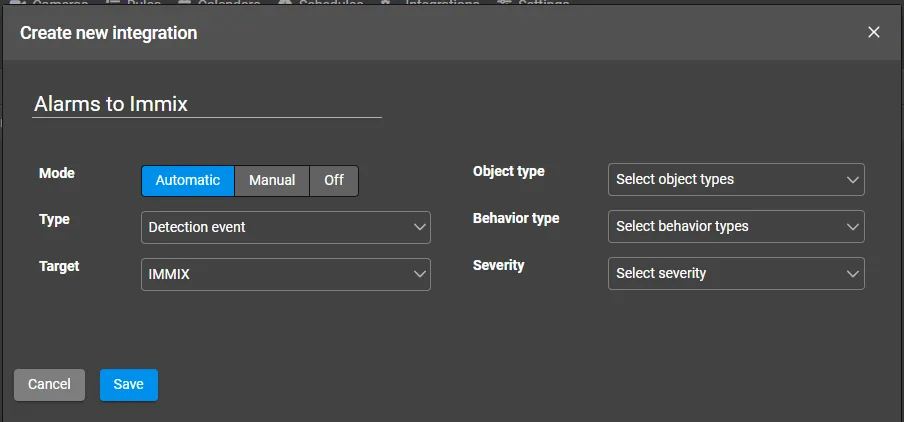
- From the menu bar, select Integrations and click the Add button. A new Integration Action line entry appears
- Enter the details
- Name: Enter a meaningful name such as the type of events being monitored
- Leave Mode to Automatic
- Type: Select whether to send Detection events (video alarms) or Health alerts (system monitoring issues).
- Target: Select the Integration Target you created and named above, for example "IMMIX"
- Optionally use the right section to filter what object types, behavior types and severities you want to send to Immix. By default, no filtering is applied and everything is sent.
- Click Save
Set S-number for IRIS+ folders
The IRIS+ folders you intend to monitor should have the External ID field set. These folders have corresponding sites in Immix and the External ID is the S-number you documented for each site.
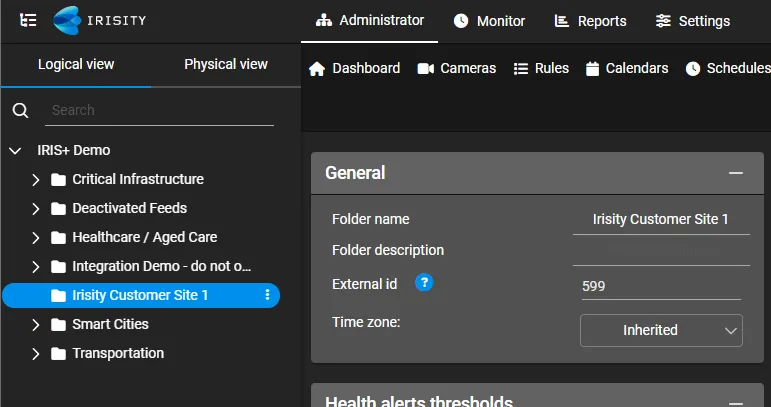
To set the folder external id
- Select the Administrator tab
- Select the right Folder in the left sidebar
- Click the Edit button
- In the External ID field, enter the S-number you documented in Immix for the corresponding site. In our example – it is 599
- Click Save
Set Alarm Number for IRIS+ cameras
Each IRIS+ camera may be defined with its own external id, Alarm Number in IMMIX. This may be required for the event created from this camera to be associated with the correct camera in Immix.
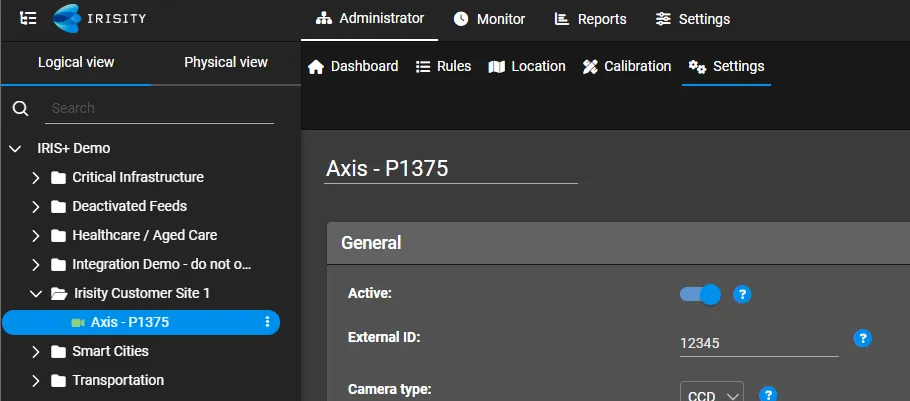
To set the camera external id
- Select the Administrator module
- In the hierarchy tree, select select the relevant Camera
- Click Edit
- In the External ID field, enter the relevant Immix Alarm Number, above "12345". This would make the full IMMIX id S599.A12345.
- Click Save
Test the Integration
An integration test is a way to ensure that events for monitored folders are being received by the integrated system. When creating a test rule or test events, make sure you choose cameras under the monitored folder.
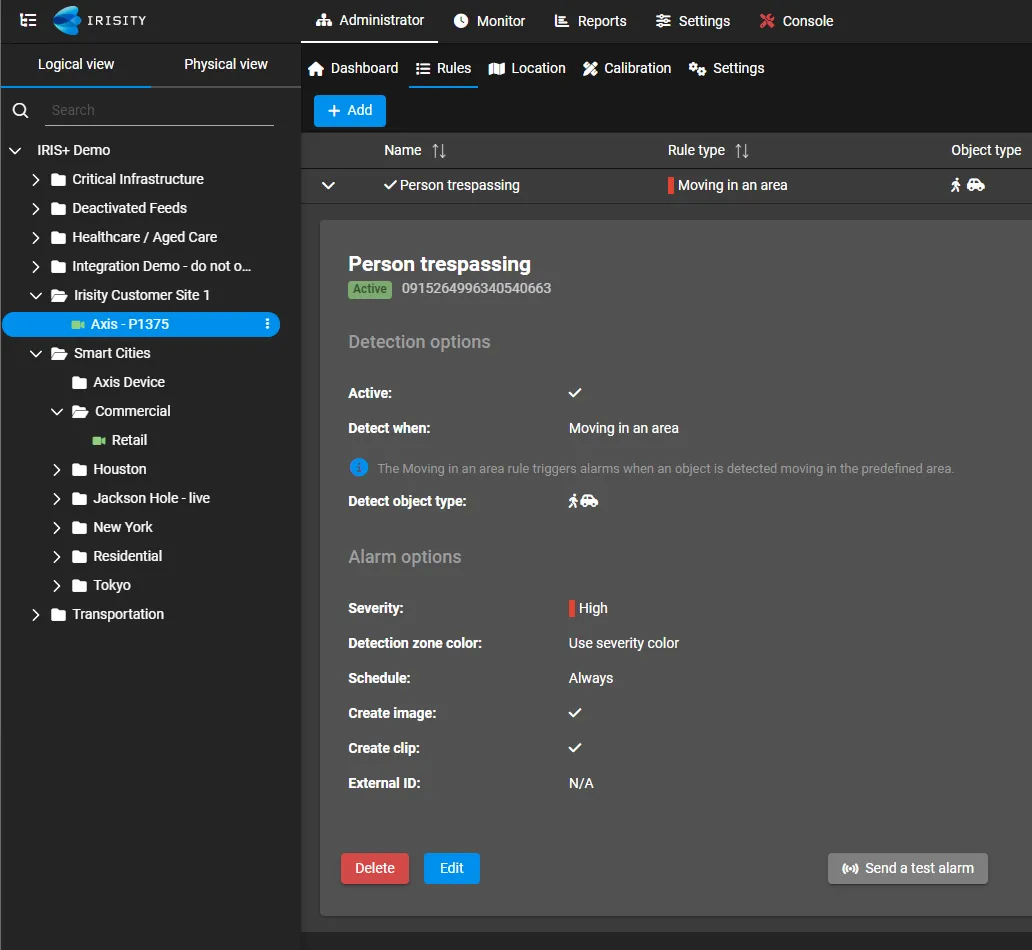
To test the integration
- Set up one or more video analytics rules in Administration => Rules for a single Camera.
- Click the Send a test alarm and verify alarms are showing up in Immix.
- Trigger an actual event from the camera and the rule in question and make sure the event shows up in IRIS+ under the Monitor tab.
- TechnicalMake sure the alarm shows up in Immix.
Technical reference appendix
Event format in Immix
The following sections list the IRIS+ event status and the corresponding status that appears in Immix for both detected events and health events.
Detection Events Format
IRIS+ Status | Immix Status |
|---|---|
INNOVI_UNKNOWNS | ObjectDetected |
INNOVI_UNKNOWNS_UNKNOWN | ObjectDetected |
INNOVI_UNKNOWNS_VEGETATION | ObjectDetected |
INNOVI_UNKNOWNS_CLOUD | ObjectDetected |
INNOVI_UNKNOWNS_OBJECT | ObjectDetected |
INNOVI_PEOPLE | PersonDetected |
INNOVI_PEOPLE_PERSON_STANDING | PersonDetected |
INNOVI_PEOPLE_PERSON_ON_THE_GROUND | PersonDetected |
INNOVI_PEOPLE_PERSON_OVERHEAD | PersonDetected |
INNOVI_VEHICLE | VehicleDetected |
INNOVI_VEHICLE_CAR | VehicleDetected |
INNOVI_VEHICLE_CAR_COMPACT | VehicleDetected |
INNOVI_VEHICLE_CAR_SUV | VehicleDetected |
INNOVI_VEHICLE_BUS | VehicleDetected |
INNOVI_VEHICLE_SCHOOL_BUS | VehicleDetected |
INNOVI_VEHICLE_MINI_BUS | VehicleDetected |
INNOVI_VEHICLE_CITY_BUS | VehicleDetected |
INNOVI_VEHICLE_PICKUP_TRUCK | VehicleDetected |
INNOVI_VEHICLE_VAN | VehicleDetected |
INNOVI_VEHICLE_TRUCK | VehicleDetected |
INNOVI_VEHICLE_TRUCK_SMALL | VehicleDetected |
INNOVI_VEHICLE_TRUCK_MEDIUM | VehicleDetected |
INNOVI_VEHICLE_TRUCK_SEMITRAILER | VehicleDetected |
INNOVI_VEHICLE_TRACTOR | VehicleDetected |
INNOVI_VEHICLE_NIGHT | VehicleDetected |
Health Event Format
Cameras
- "TamperAlarm" - in blocked/saturated/dark
- "VideoLoss" in all other health events
- "Frame rate is too low (IRIS+ camera ID nnnnnn)"
- "Frame rate is too high (IRIS+ camera ID nnnnnn)"
- "Scene is blocked (IRIS+ camera ID nnnnnn)"
- "Scene is saturated (IRIS+ camera ID nnnnnn)"
- "Scene is too dark (IRIS+ camera ID nnnnnn)"
- "Communication failed (IRIS+ camera ID nnnnnn)"
- "General error (IRIS+ camera ID nnnnnn)"
- "RTSP error (IRIS+ camera ID nnnnnn)"
- "Incompatible video (IRIS+ camera ID nnnnnn)"
- "Resolution error (IRIS+ camera ID nnnnnn)"
Edge devices
- "SystemEvent"
- "High latency (IRIS+ Edge ID nnnnnn)"
- "Overloaded (IRIS+ Edge ID nnnnnn)"
- "No comm. with cloud (IRIS+ Edge ID nnnnnn)"
IRIS+ (Edge software handling multiple cameras)
- "SystemEvent"
- "No comm. with cloud (IRIS+ Agent ID nnnnnn)"
- "High latency (IRIS+ Agent ID nnnnnn)"